
General Settings

Export Destination
Destination
You can select your desired location by clicking on the Folder Icon. Upon right-clicking folder icon, Production Data will show the Full Path associated with said folder.
If no folder has been chosen, Production Data will display Please select! If the saved folder can no longer be found, Missing Folder! will be shown.
Export Folder Naming
Each export is saved within a subfolder inside your chosen export destination. In order to mitigate conflicts and potential overwrites of previously generated reports, Production Data incorporates the project name and the current date and time within the folder nomenclature. The timestamp uses the yyyy-MM-dd-HH-mm-ss format. Consequently, each export yields a distinct and uniquely identified result.
Info
My Project-2026-07-13-10-30-45
Export Mode
Select your desired Export Mode.
- Automatic Default
- Manual
In Automatic mode, Production Data begins the export as soon as a project is received. In Manual mode, the project is queued on Extract and you confirm the export with Start Export when you are ready.
In Automatic mode, dropping a project on the Roles tab will switch to Extract before the export runs.
The current mode is shown as a badge on Extract. You can also switch modes from the File menu (Switch to Manual Export / Switch to Automatic Export) or by pressing ⌘ ⇧ E on your keyboard.
Info
Production Data processes one FCPXML project per action. Whether you drag and drop onto Extract or Roles, choose a file with Choose File, use File → Open…, or open a project from Finder or the Dock, only a single project is accepted. If multiple files are offered at once, Production Data uses the first item only.
Info
On macOS, dropping an FCPXML onto the Dock icon does not always bring Production Data to the front. If the window stays in the background, click the app icon to restore it.
Export Options
Timecode Format
Select your desired Timecode Format.
- HH:MM:SS:FF Default
- Frames
- Feet+Frames
- HH:MM:SS
This setting controls how timeline time values appear in the Excel workbook.
Exclude Disabled Clips
Checking Exclude Disabled Clips will prevent Production Data from including disabled clips in the report.
By Default , disabled clips are included in the spreadsheet.
Include Markers Outside Clip Boundaries
Checking Include Markers Outside Clip Boundaries includes markers whose start falls outside the host clip’s media range — markers Final Cut Pro hides from the timeline and Tags list — on the Markers sheet.
When enabled, the Markers sheet also gains a Hidden column: ✓ for markers outside clip boundaries and ✗ for markers inside. By
Default
, those out-of-bounds markers are omitted and the Hidden column is not shown.
Enable this option when you need a complete marker inventory, including markers that are not visible in Final Cut Pro’s Tags. It only takes effect when Markers is enabled under
Info
The Hidden column is not listed under
Include Speed Change Settings in Role Inventory
Checking Include Speed Change Settings in Role Inventory adds a Speed Change Settings column after Effects on Role Inventory sheets (Selected Roles Inventory and each per-role tab). Cells show the retime percent for clips with a non-identity speed change (for example 50.0%); other clips leave the cell blank.
By
Default
, this column is omitted. Enable it when you need speed-change values on the role inventory without opening the separate Speed Change Effects sheet. This option is independent of Speed Change Effects under
Info
The Speed Change Settings column is not listed under
Include Screenshots in Role Inventory
Checking Include Screenshots in Role Inventory adds a Screenshot column after Row on Role Inventory sheets and embeds a Source In frame grab in the Excel workbook (.xlsx). Embeds keep the image aspect ratio. The same export also saves full-frame PNGs in a Screenshots folder beside the workbook.
By
Default
, screenshots are omitted. Enable this option when you want a visual reference on each inventory row. If media cannot be read, the cell is left blank and that row is left out of the Screenshots folder.
PDF export is unaffected — the PDF does not include a Screenshot column, embeds, or the Screenshots folder.
When original media is missing or unreadable, Production Data uses proxy media for the frame grab when a proxy file is available. Original and proxy media often live in different folders.
During export, Production Data may show Choose Media Folder if it cannot read the original or proxy media from the FCPXML or export folder alone (for example media on an external volume). The panel title is Choose Media Folder, the message is Original media, proxy media, a Final Cut Pro library, or an enclosing folder., and the button is Grant Access. Choose one of those locations, then press Grant Access.
After you grant original media, the same Choose Media Folder panel may appear again for unread proxy or transcoded media — even when the original files are already readable. Some formats, such as MXF or camera RAW, still need a readable proxy for the frame grab. Grant the proxy folder the same way. Production Data keeps every successful grant for that export.
Info
If remaining files still cannot be read, Production Data offers Choose Another Folder, Continue Without Remaining Screenshots, or Cancel Export. Leftover cells stay blank if you continue, and those rows are left out of the Screenshots folder; the rest of the workbook still exports. Cancelling the first Choose Media Folder prompt cancels that export.
A Final Cut Pro library (.fcpbundle) is accepted as a file or a folder. A library may only reference external media — if screenshots stay blank, grant the actual original or proxy folder instead.
Screenshots work for most common video files this Mac can decode (via AVFoundation) — not every format. They are reliable for typical Final Cut Pro library media when the files are on disk and reachable.
Typically supported
- ProRes, H.264/AVC, and HEVC/H.265 in
.mov,.mp4, and.m4v - Many camera originals Final Cut Pro uses day to day
- Still images (PNG, JPEG, and similar) — the image file itself is used;
Source Intime is ignored
Often blank
- Missing or offline media (the path does not resolve on this Mac)
- Codecs this Mac cannot decode
- Audio-only rows (skipped on purpose)
- Titles and generators with no media file
- Some MXF, proprietary, or poorly supported wrappers
- Corrupt or DRM-locked files
The frame is taken at Source In relative to the asset start — not Timeline In. On hard GOP structures, seek tolerance may be loosened and, if needed, fall back to the first frame, so you may see a nearby frame rather than the exact Source In frame.
Info
The Screenshot column is not listed under
Distinguish Original and Proxy Media
Checking Distinguish Original and Proxy Media separates missing original and proxy media into distinct columns on the Media Summary sheet, rather than combining them into a single Missing Media column.
By
Default
, Media Summary uses one Missing Media column. Enable this option when you need to tell original and proxy media apart. It only takes effect when Media Summary is enabled under
Protect Sheets
Checking Protect Sheets applies worksheet protection to every sheet in the Excel workbook (.xlsx), including the cover sheet and all content sheets. This discourages accidental edits after export.
By Default , sheets are not protected. Enable this option when you want a light edit lock on the spreadsheet. Excel still opens the file without a password, and anyone can turn protection off in Excel. This is an edit lock, not file-open encryption.
Protect Sheets applies to the Excel workbook only. PDF export is unaffected — use Preview’s Encrypt (or another PDF tool) if you need to password-protect a PDF.
Create PDF Report
Checking Create PDF Report instructs Production Data to write a PDF report (.pdf) alongside the Excel workbook (.xlsx) for each export. Both files are saved in the same timestamped subfolder within your Export Destination.
By
Default
, only the Excel workbook is exported. Enable this option when you need a shareable PDF for review or distribution. When enabled, Production Data exports MyTimeline.xlsx and MyTimeline.pdf in the same folder (for example, My Project-2026-07-13-10-30-45/MyTimeline.xlsx and MyTimeline.pdf).
The PDF report is generated from the same built report as the Excel export. The columns, sheets, role inclusions, timecode format, and clip filtering reflected in the PDF are determined entirely by the Active Configuration selected in the toolbar or Configurations panel.
Production Data does not maintain separate PDF-specific sheet, column, or role settings. Any change to Sheets, Columns, or Roles in the active Configuration applies equally to both the .xlsx and .pdf outputs for that export. This is intentional.
To produce a different PDF layout or column set, switch to or update the appropriate Configurations before exporting.
Experimental
PDF export is experimental and optimised for A4 landscape. Tables paginate across pages and cell text may truncate. The Row column is included by default for traceability; exclude it the same way as in Excel. Matching sheet pages share a tint. For the complete dataset and column options, use the accompanying Excel (.xlsx) report.
Warning
On large or complex timelines — especially with Full Report enabled — the PDF can run to a thousand pages, and sometimes several thousand or more. Preview can take a very long time to open, or the file can be impractical to use. Leave Create PDF Report off for those jobs.
Sheets
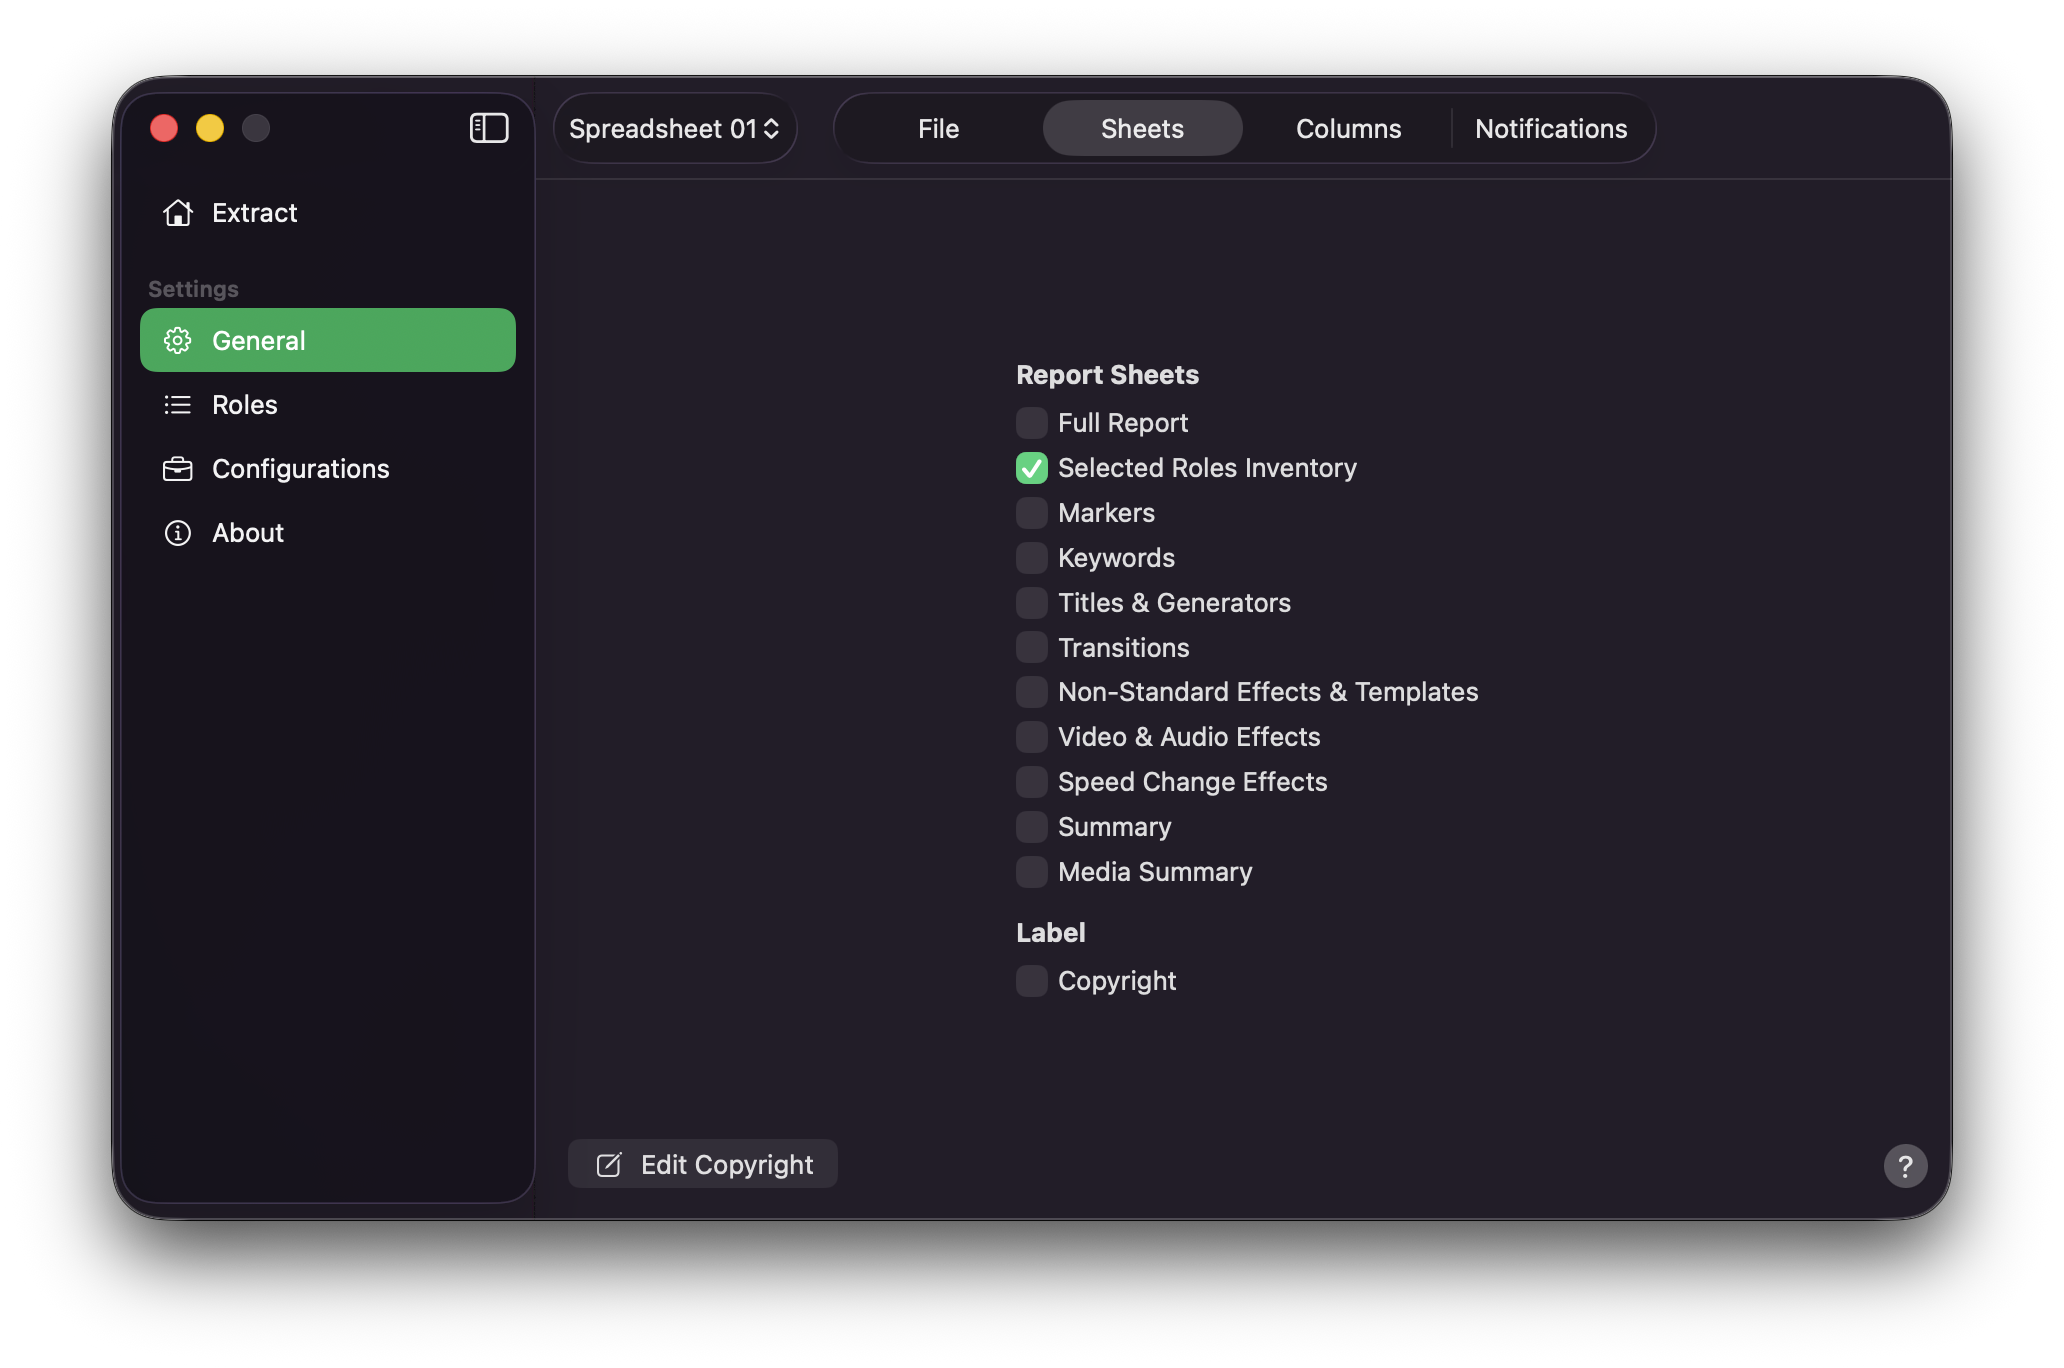
By
Default
, Production Data includes Selected Roles Inventory in the Excel report. This tab permits you to choose which worksheets are included in each export.
Full Report
Turning Full Report on enables every optional sheet below. Turning it off allows you to choose sheets individually.
Report Sheets
- Selected Roles Inventory Default
- Markers
- Keywords
- Titles & Generators
- Transitions
- Non-Standard Effects & Templates
- Video & Audio Effects
- Speed Change Effects
- Summary
- Media Summary
A summary of enabled sheets is also shown in the status bar on Extract.
Checking Non-Standard Effects & Templates includes non-Apple effects and Motion templates from the timeline on their own sheet. Missing effect or template paths are flagged as MISSING. By
Default
, this sheet is not included.
Info
In the Excel workbook, the worksheet tab may appear as Non-Std Effects & Templates because Excel limits sheet names to 31 characters. The Sheets toggle and Extract status bar use the full name.
Info
Media Summary lists media files referenced in the project. Production Data does not read or copy your media files for this sheet. When the sheet is enabled and no referenced media is missing, Excel and PDF keep the headers and show a No Missing Media status row.
Info
When an enabled sheet has no matching items in the project, Excel and PDF keep the sheet headers and show a single status row — for example No Markers Found, No Keywords Found, No Titles & Generators Found, No Transitions Found, No Effects Found, No Speed Change Effects Found, No Non-Std Effects Found, or No Roles Found. Individual per-role inventory tabs may still be omitted when empty. Summary keeps its project-metrics layout.
Label
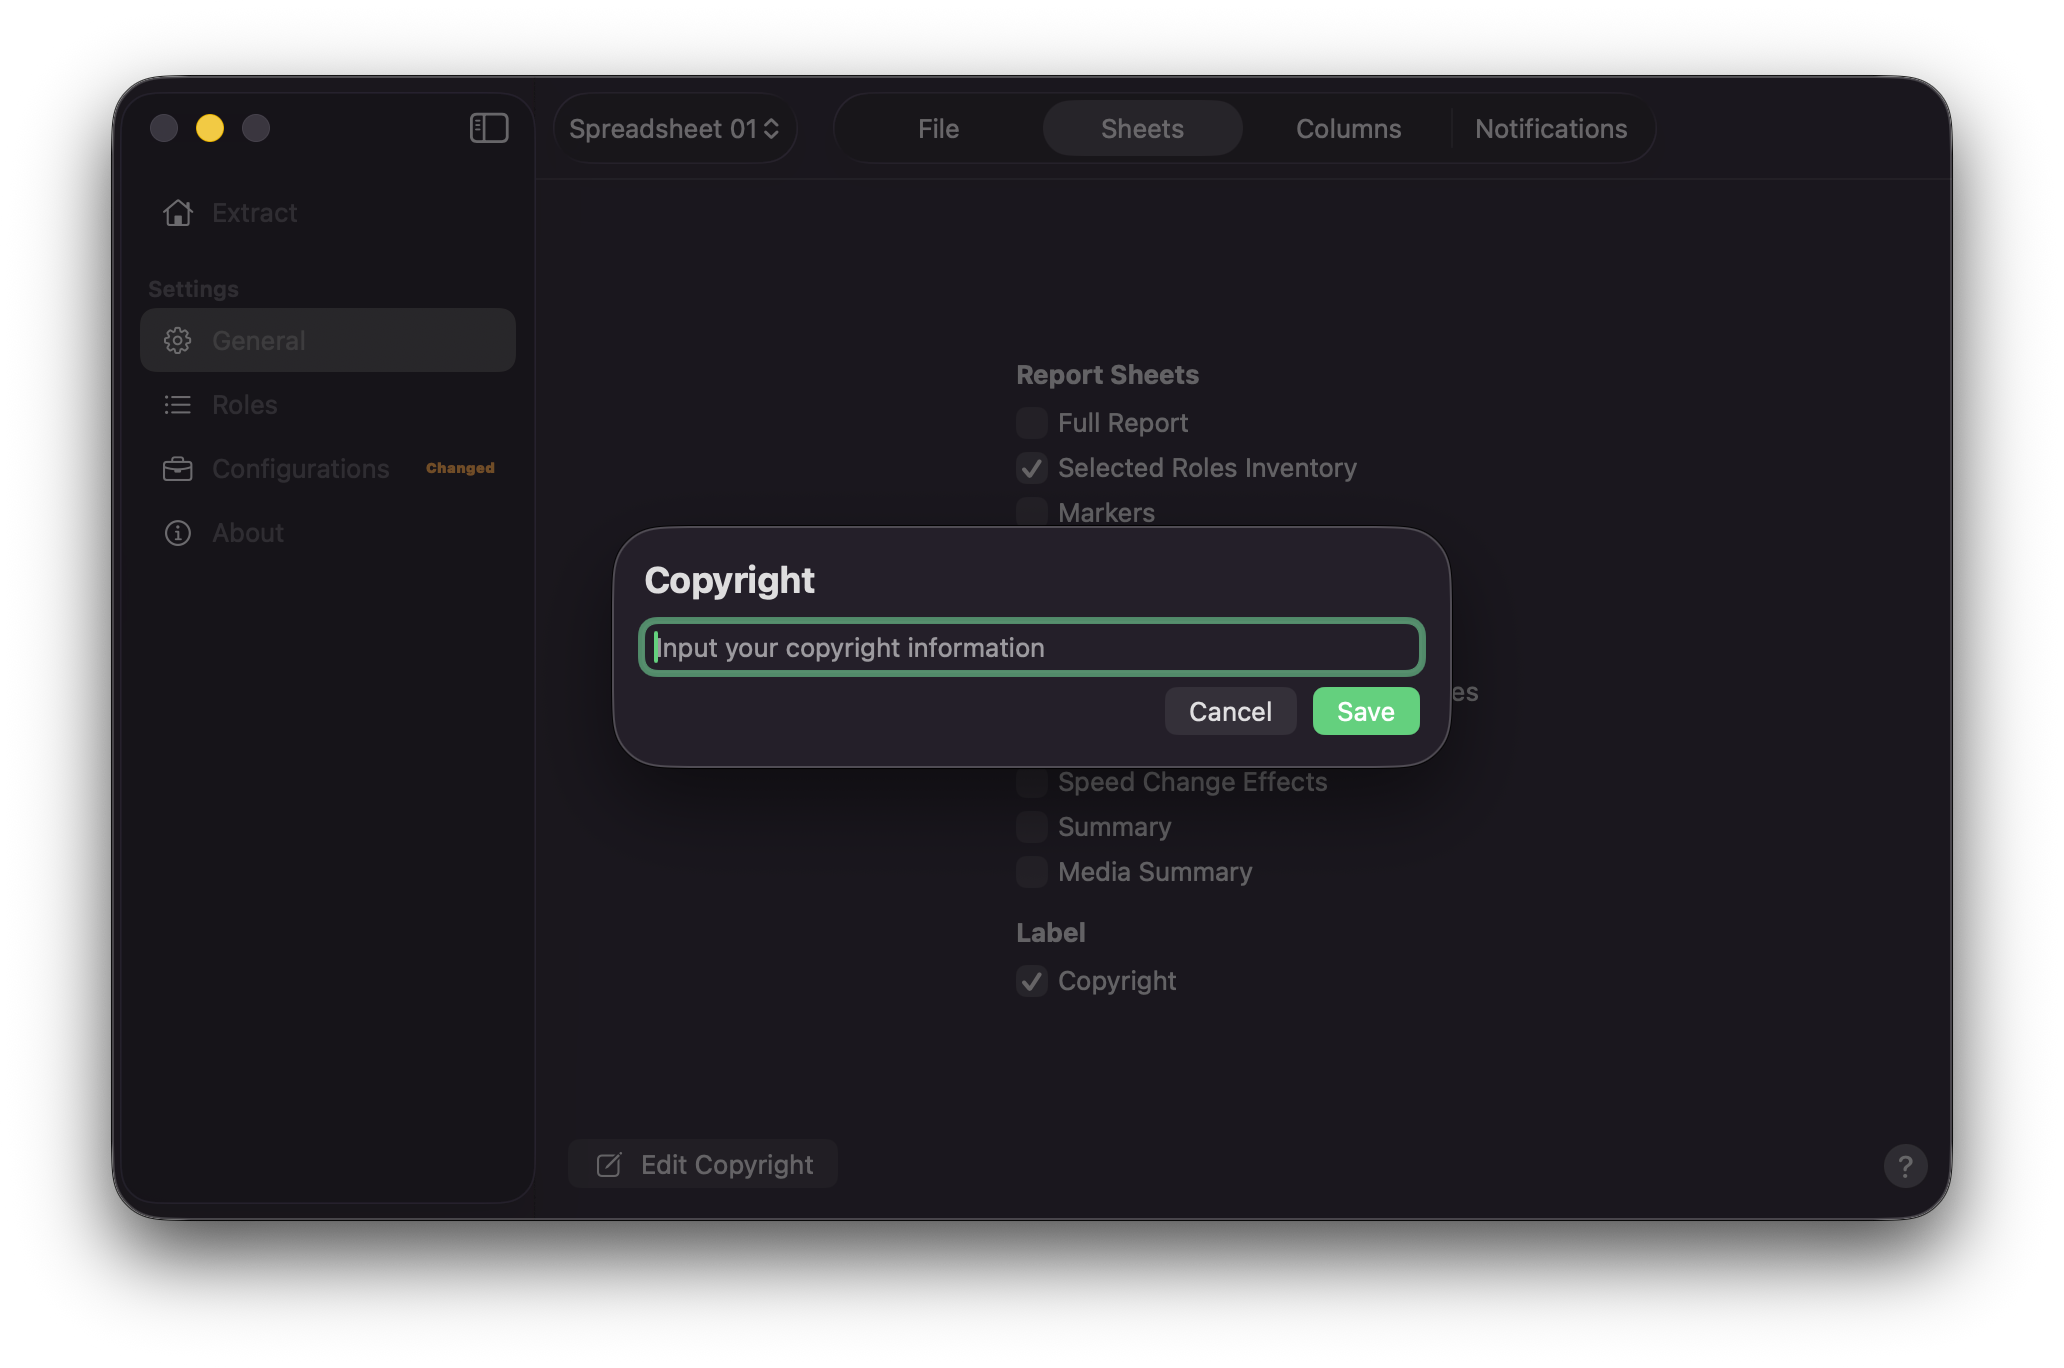
The Excel and PDF report covers use a four-row branding stack: Created by Production Data, Created on with the export timestamp, Visit https://productiondata.theacharya.co, and an optional copyright line when enabled.
The Label section controls that optional copyright line.
Checking Copyright includes your text on the Excel cover (after Visit) and, when
Press Edit Copyright at the bottom of the Sheets tab to enter or change the text. Enter the string as typed — year, ©, or any wording you prefer. Production Data does not insert a copyright symbol or year for you. When text is set, the current value is shown beside the button.
If Copyright is turned on while the text is empty, the editor opens so you can fill it in. Turning Copyright off keeps your saved text for later use but omits the label from the next export.
Info
Whitespace-only text is treated as empty and is not written to the report.
Columns
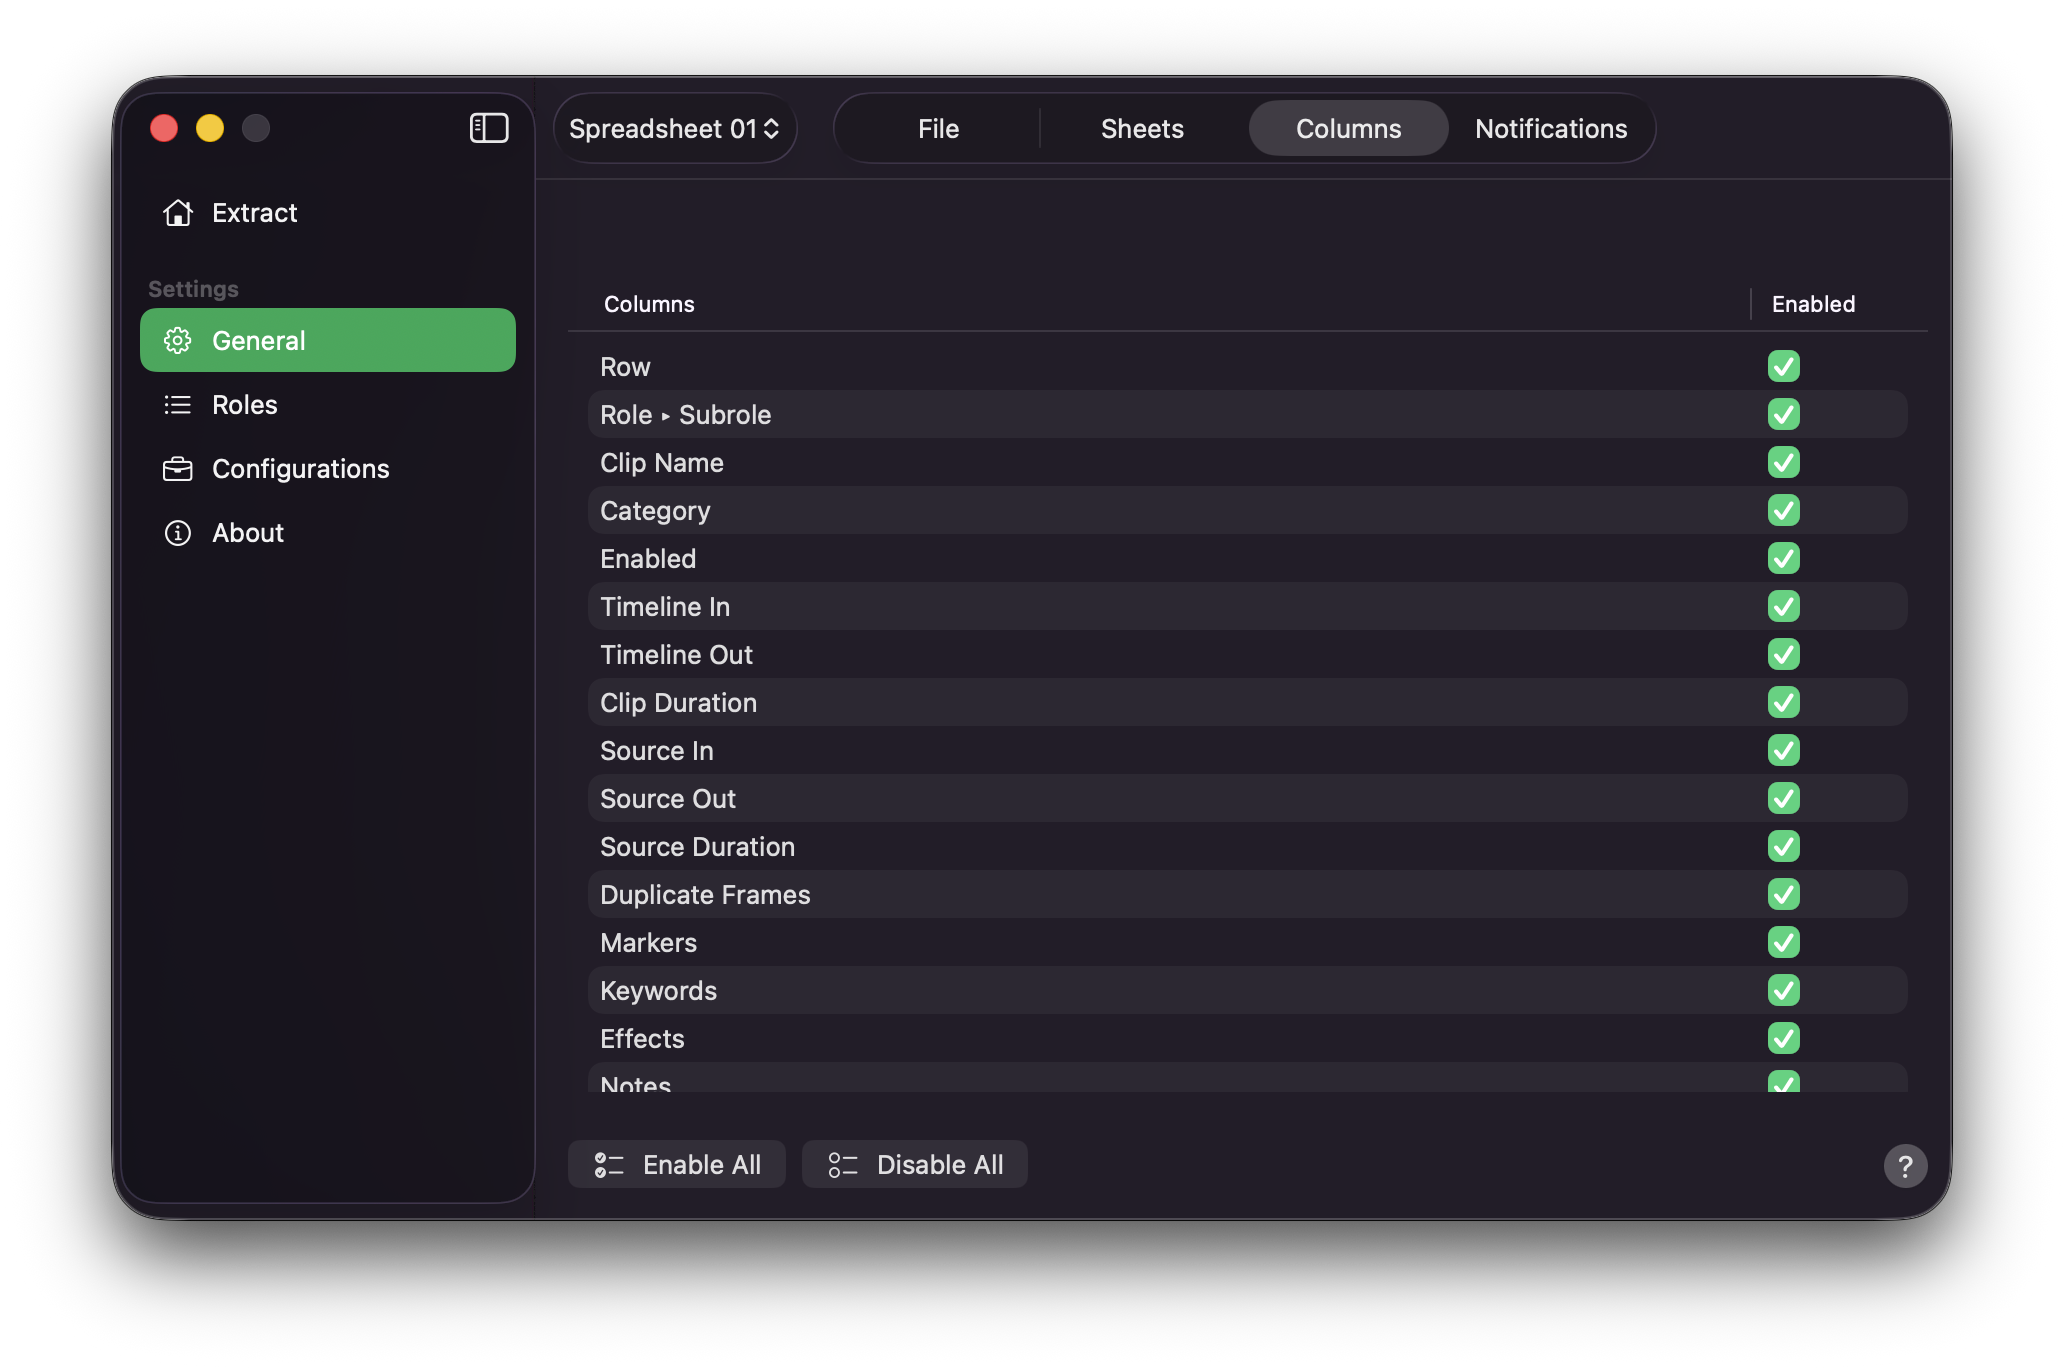
The Columns tab controls which columns appear on role inventory sheets in the Excel workbook. Use the table to turn individual columns on or off. Disabled columns are omitted from the export.
Info
Role inventory sheets also include a Total footer that sums Clip Duration under the Timeline Out column. If Timeline Out or Clip Duration is excluded, the Total footer is omitted entirely (Excel and PDF).
Info
Speed Change Settings and Screenshot on Role Inventory sheets are controlled under
Enable All
Pressing Enable All will check all column selections.
Disable All
Pressing Disable All will uncheck all column selections.
Notifications
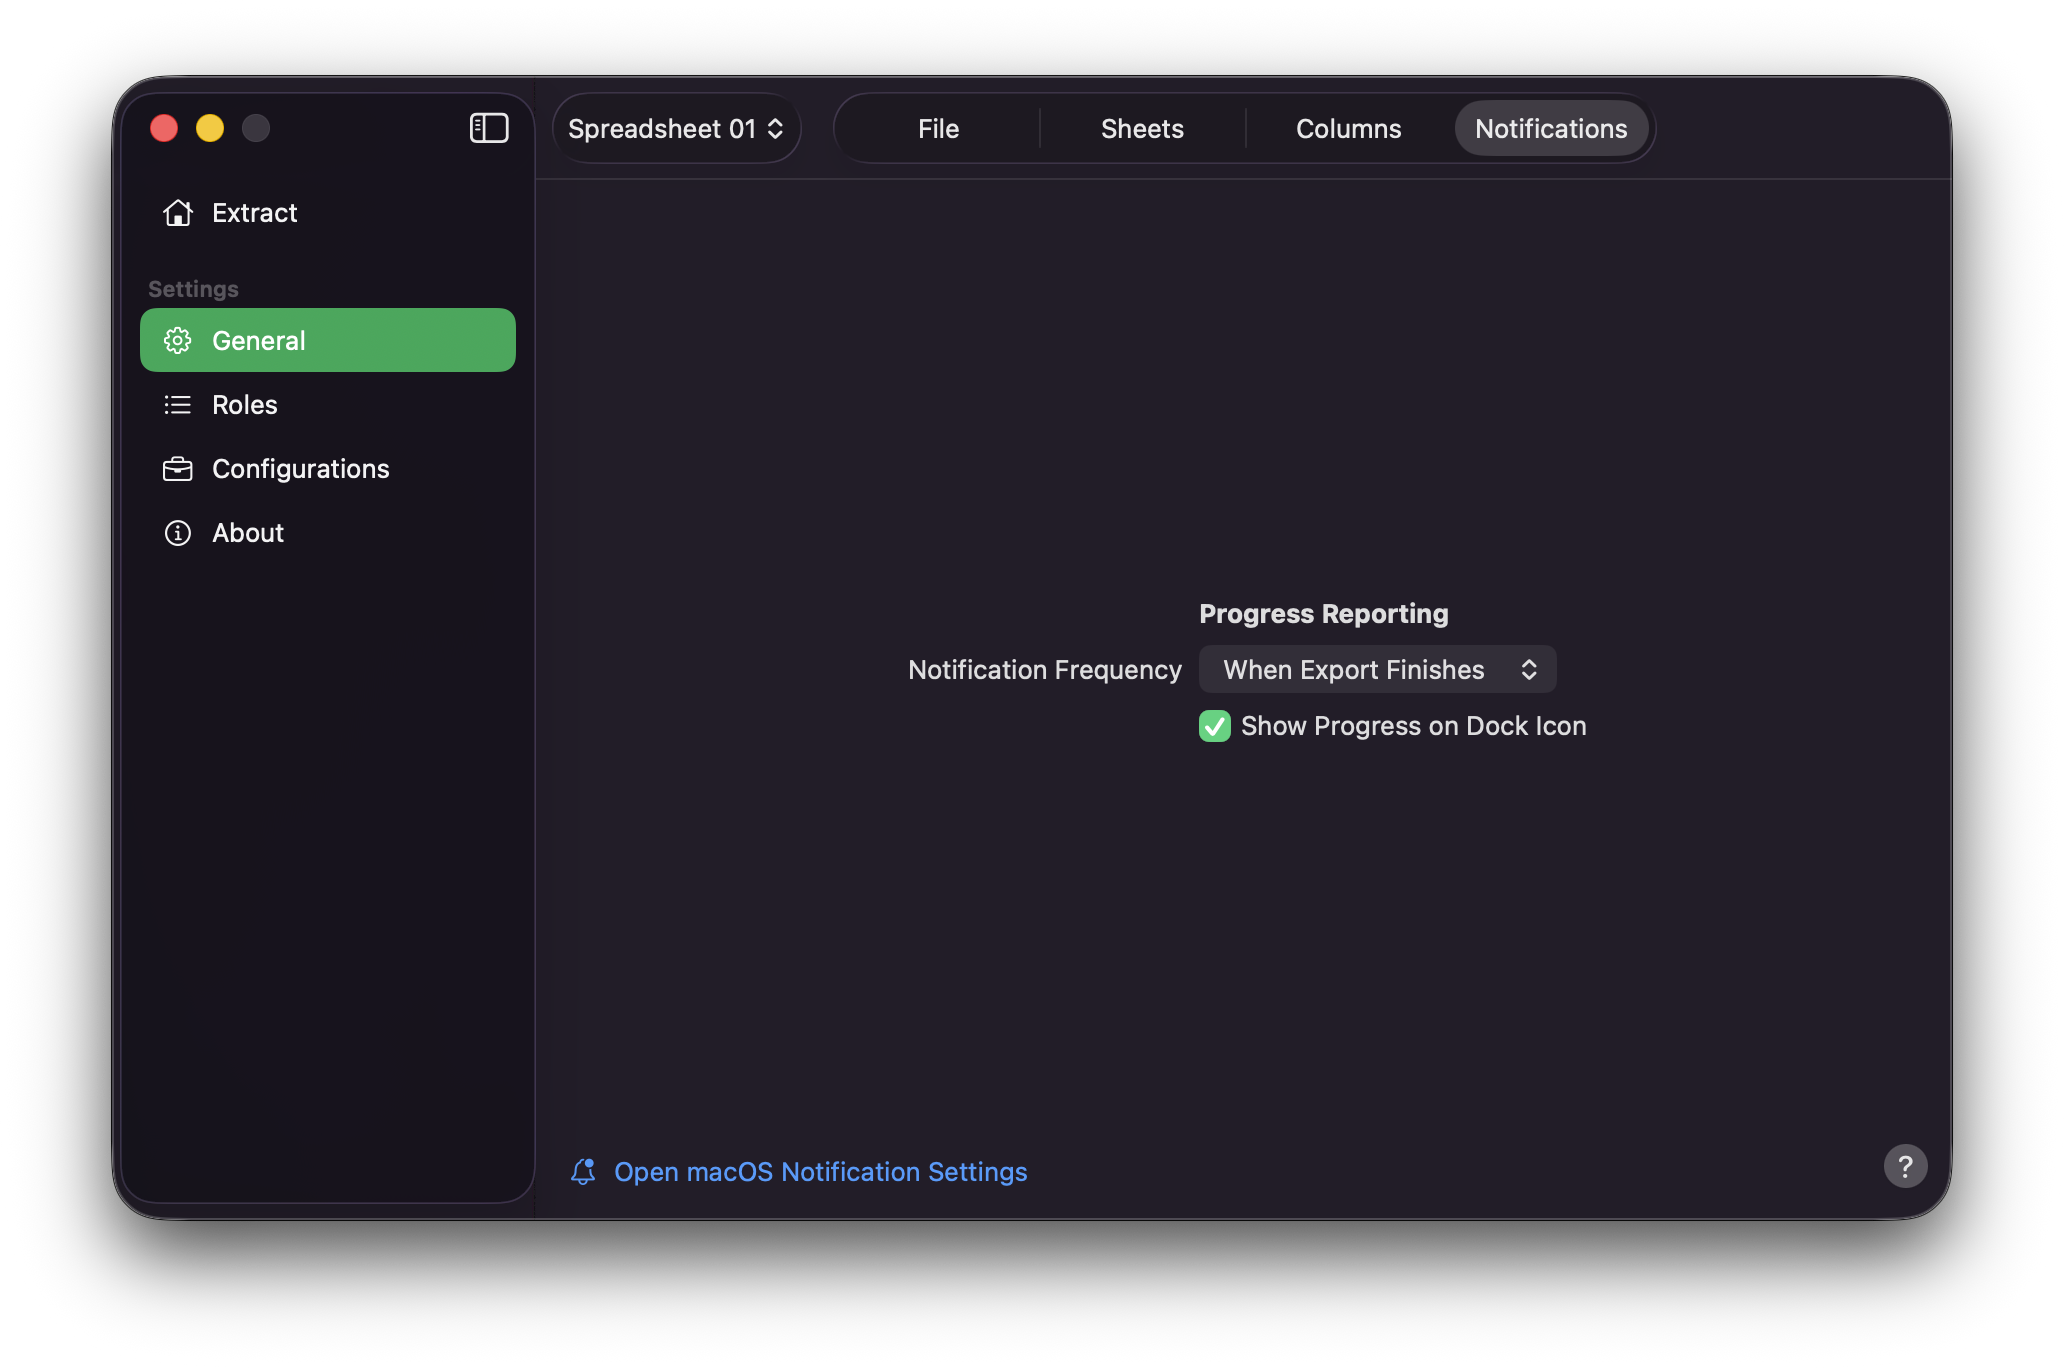
Notification Frequency
Production Data seamlessly integrates with the native macOS Notifications framework, delivering timely alerts upon the successful completion of tasks.
Select your desired Notification Frequency.
- Never
- When Export Finishes Default
- Each Report Step
Info
Each Report Step notifies you as each enabled report sheet is built and when the spreadsheet is saved, followed by a notification when the export finishes. The number of notifications depends on which sheets you have enabled under Sheets.
Show Progress on Dock Icon
By Default Progress Bar is shown on Production Data's dock icon.
Open macOS Notification Settings
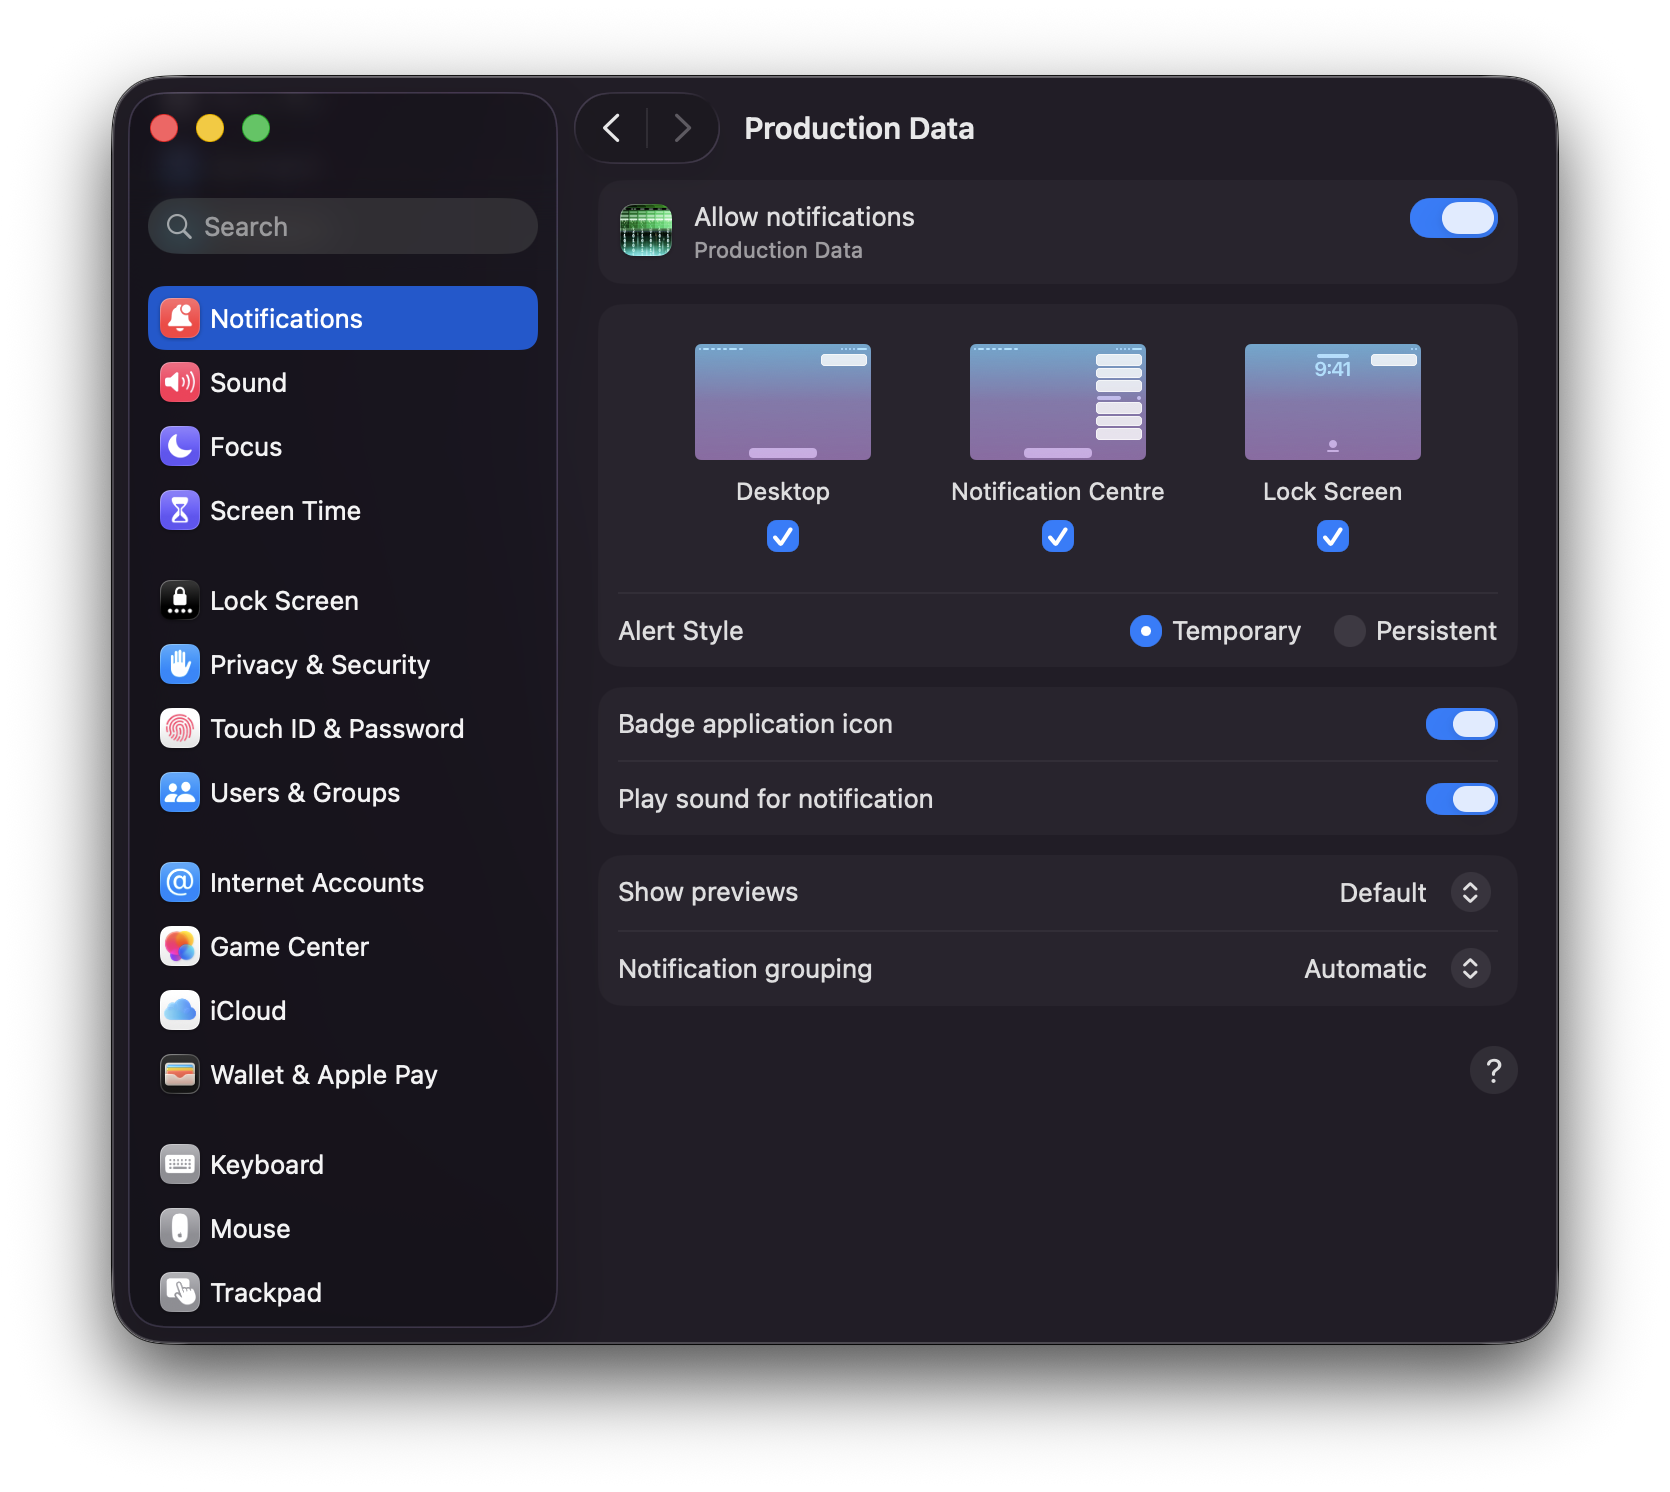
Select the Open macOS Notification Settings link to open macOS Notification Settings. Navigate to Production Data to manage notification settings.
Info
Production Data will only show up in the macOS Notification Settings solely after the initial prompting attempt. If Production Data is the focused application, notifications won’t make a sound or appear on the screen.